How to read Amazon Search Query Performance by product
See every search shoppers use to find your products, your share of views, clicks and purchases against the market, and your ad spend on each.
Search Performance shows Amazon's own search data for your products: every search shoppers typed to find them, and how often those shoppers saw, clicked and bought your products against everyone else on the same searches. Beside it sit your own ad spend and ad orders on each search, so you can see where ad money goes on searches you lose, and act on a search from the same page.
This guide goes through it with a screenshot of each step (the control to use is ringed and numbered). It takes about six minutes.
Step 1 · Open Search Performance and set the weeks
In the side menu, under Advertising, click Search Performance (Growth and Professional plans). It needs Brand Registry, because Amazon gives this report to brand owners only. Pick the weeks to read (1): last week, the last 4 or the last 8. Choose the products to look at (2), and type in Find a search (3) to go straight to one search. A new week arrives every Tuesday.

Step 2 · Choose one product, several or all
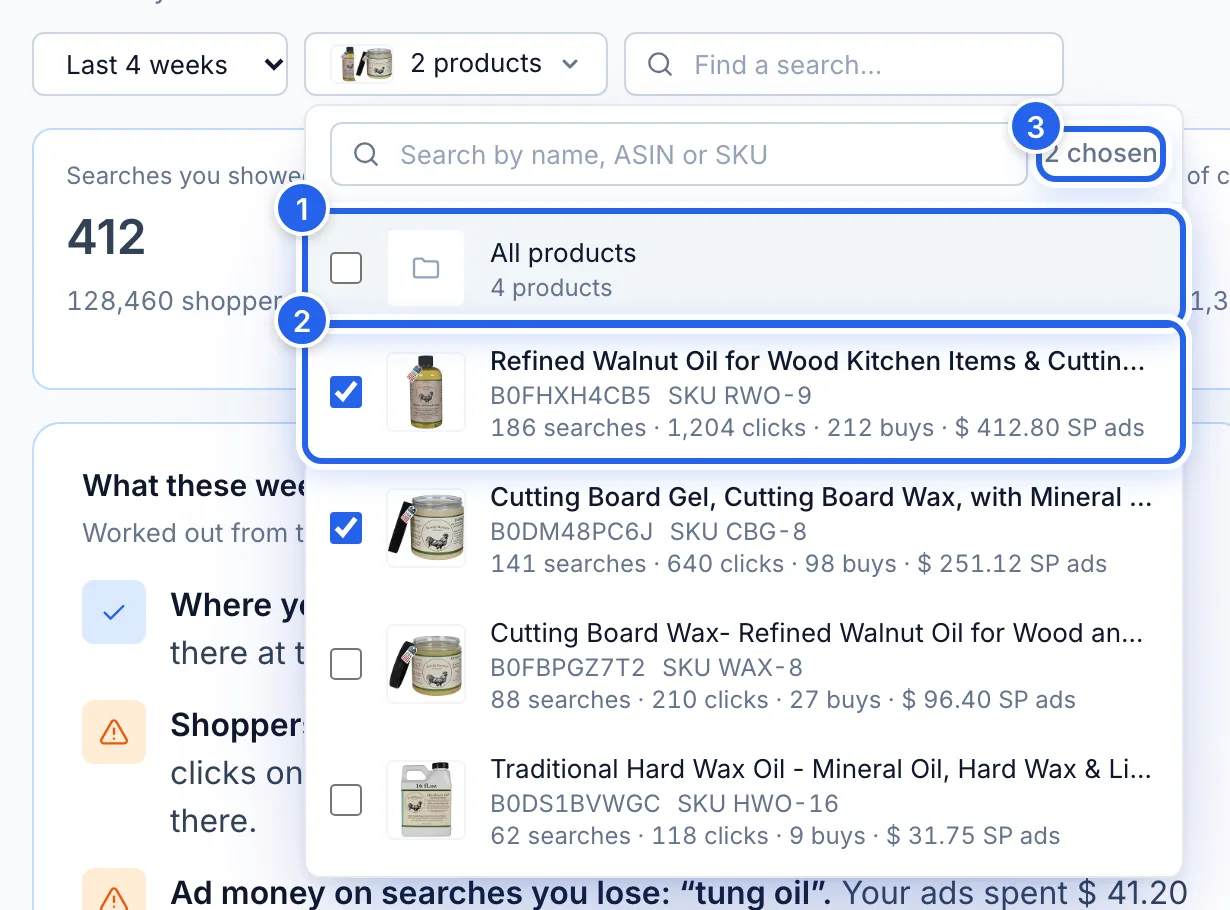
Click the product picker to see each product with its picture, ASIN, SKU and its numbers in these weeks. All products (1) shows everything. Tick a product (2) to look at it alone, or tick several to add them up; the count (3) says how many you chose. With products chosen, the ad numbers cover Sponsored Products only: a Sponsored Brands ad shows several products at once, and Amazon doesn't split its spend by product. Sponsored Display has no search terms.
Step 3 · Read the headline numbers
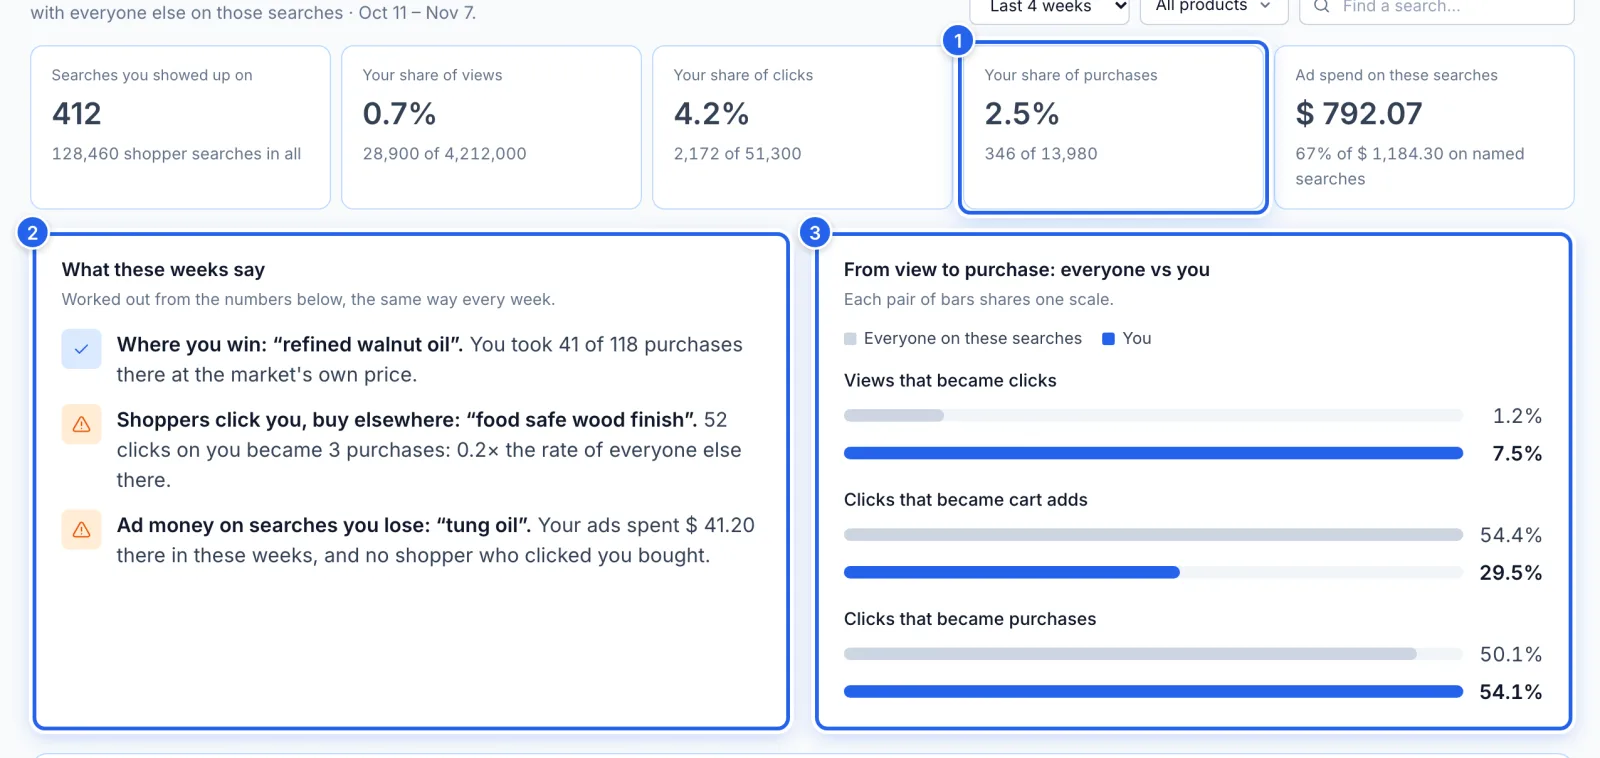
The cards across the top count the searches you showed up on and your share of all the views, clicks and purchases on them. Your share of purchases (1) is the one to watch. What these weeks say (2) picks out the searches that matter most, worked out the same way every week. From view to purchase (3) sets your rates against everyone's on the same searches: blue is you, grey is everyone.
Step 4 · Pick a group of searches
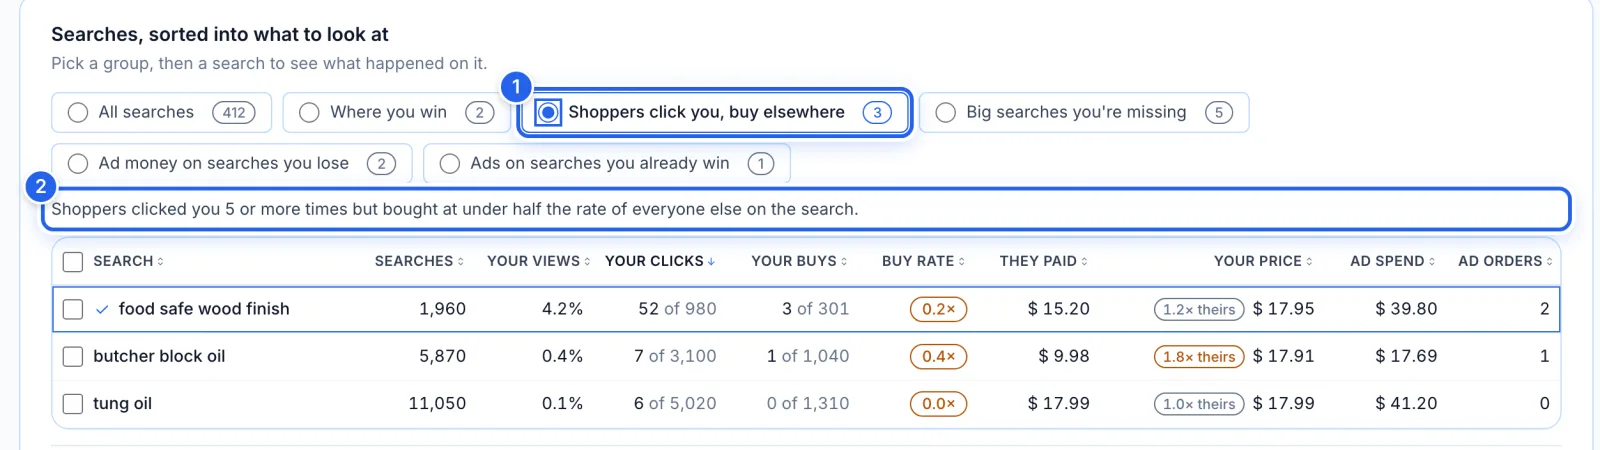
The groups sort your searches into what to look at: Where you win, Shoppers click you, buy elsewhere (1), Big searches you're missing, Ad money on searches you lose, and Ads on searches you already win. Each shows how many searches are in it, and the line under them (2) says what puts a search there. Click a column heading to sort.
Step 5 · Read a search's row
Each row sets you against everyone who typed those words. Buy rate (1) is your purchases per click against the market's: 1.0× is the same, and it turns orange under 0.5×. Your price (2) is set against what shoppers paid there, orange from 1.5× theirs. Ad spend (3) and Ad orders come from your own ad report. A dash (4) means there was nothing to measure; hover over it to see why, such as No clicks.

Step 6 · Open a search
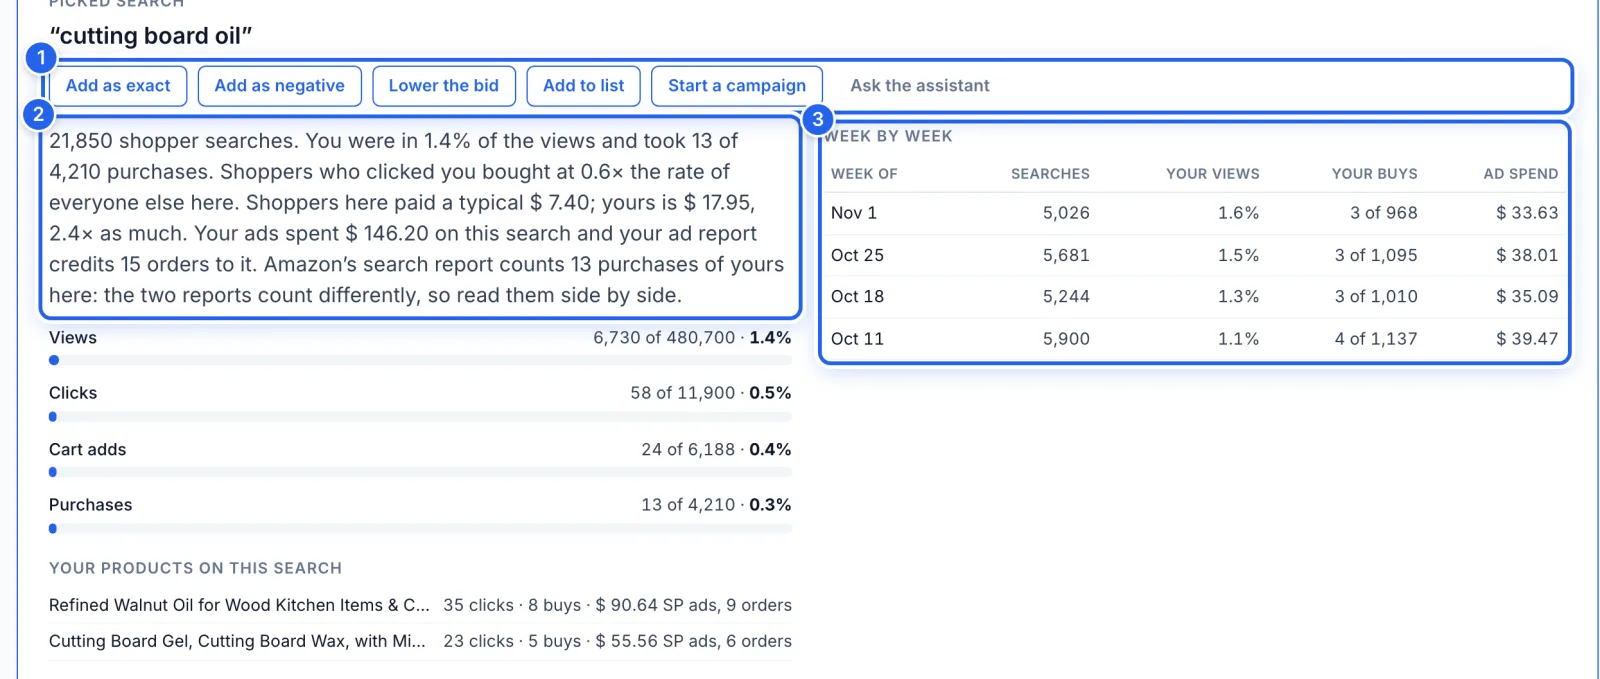
Click a search to open it below the table. Its actions sit at the top (1): Add as exact and Add as negative go to Amazon once you confirm, Lower the bid goes to your review queue, Add to list saves it, Start a campaign opens Campaign Setup with the search and product filled in, and Ask the assistant (Professional) asks about it. The summary (2) says what happened in plain words, and Week by week (3) shows each week.
Step 7 · See which of your ads spent on it
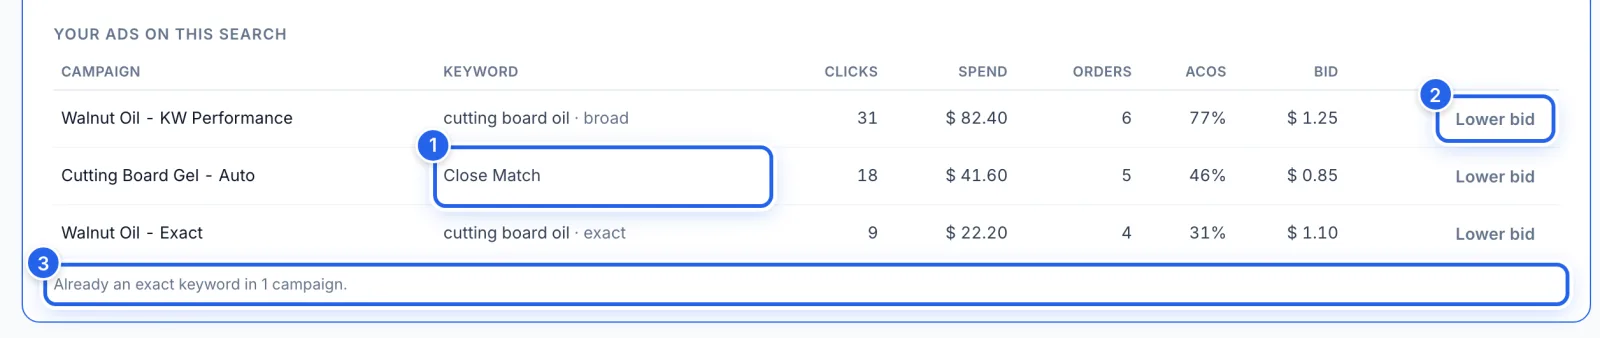
Your ads on this search lists every keyword and target that spent on the search, with its clicks, spend, orders, ACoS and bid. An auto target reads Close Match (1), Loose Match, Substitutes or Complements. Lower bid (2) checks that one keyword. The line under the table (3) says where the search is already an exact keyword or already blocked, so you don't add it twice.
Step 8 · Lower the bid, placements first
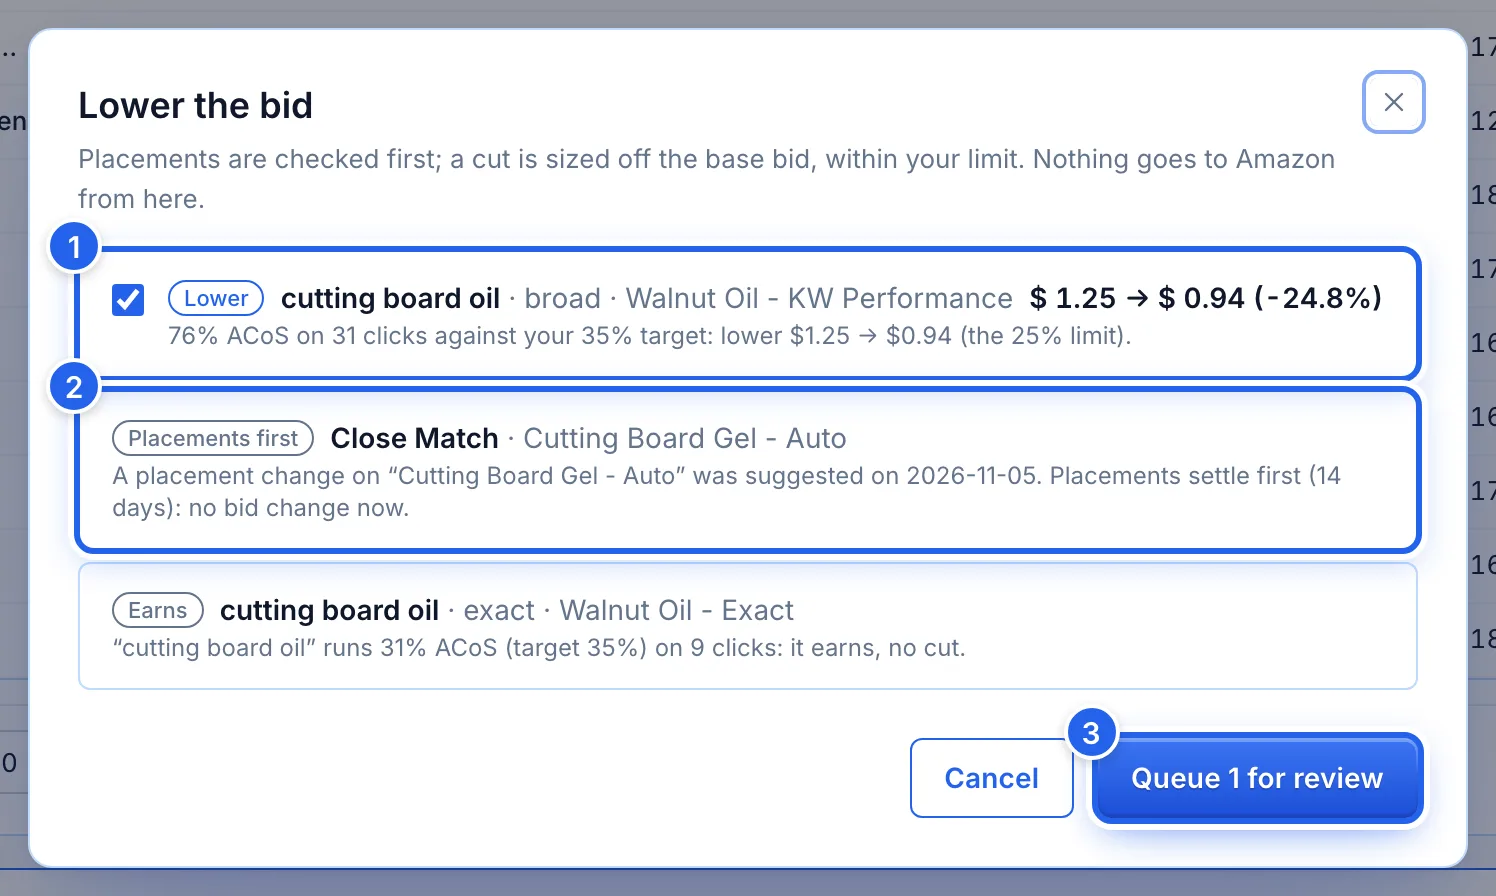
Lower the bid checks every keyword that spent on the search and shows what it would do before anything is saved. A cut (1) is sized from the keyword's own bid, your target ACoS and your bid-change limit. If a placement change was suggested in the last 14 days, or is waiting for you, that keyword is held (2): placements settle first. A keyword that already earns is left alone. Queue for review (3) saves the ticked cuts to AI Recommendations for your approval; nothing goes to Amazon from here.
Step 9 · Act on several searches at once
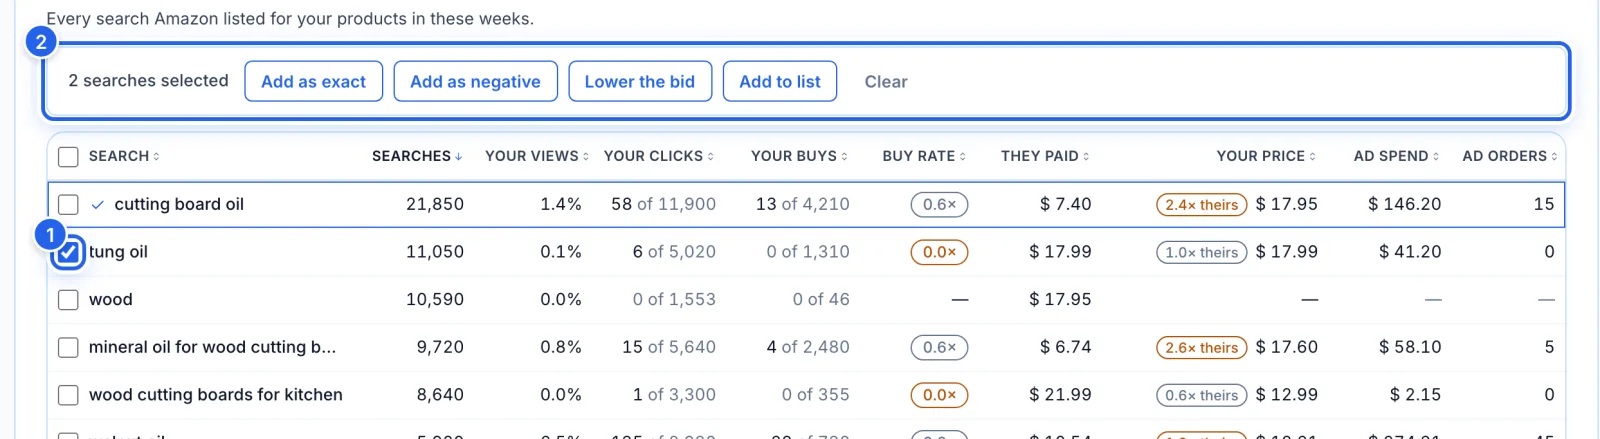
Tick the searches to act on (1), or the box in the header to tick the whole page. The bar above the table (2) counts them and offers the same actions for all of them: Add as exact, Add as negative, Lower the bid and Add to list. Clear unticks them.
Good to know
- Brand Registry. The data is Amazon's Brand Analytics Search Query Performance report, which Amazon gives to brand owners only. Without it, the page says so instead of showing zeros.
- Weekly, with history. A new week arrives every Tuesday. The first time, your last 8 weeks and 17 months fill in within a day or two; a large catalog can take up to a week.
- Two reports, counted differently. Amazon's search report and your ad report count purchases differently: an ad can be credited with an order the search report files elsewhere. Read them side by side; the two never subtract into an “organic” number.
- Up to 100 searches per product. Amazon lists at most 100 searches for each product each week, so totals here are at least these numbers.
- What goes where. Add as exact and Add as negative go to Amazon once you confirm, and a negative that would block one of your own keywords is refused, and says so. Lower the bid only saves suggestions to your review queue.
Tips
- Start with Shoppers click you, buy elsewhere: shoppers found you there and chose someone else. Compare Your price with They paid before you change a bid.
- Ad money on searches you lose is where a negative or a lower bid saves the most.
- A big search you're missing is worth a campaign of its own: Start a campaign fills in the search and the product (see How to create an Amazon Sponsored Products campaign).